You’ve launched your business, and you need to get the word out. But you’re not sure where to start — should you spend your small budget on Facebook ads or start a blog?
There’s a better answer: build an email list.
Email marketing is one of the most effective ways of growing your business. Marketers love it. Small business owners love it. Enterprise businesses love it, too.
But it might feel daunting to start an email list from scratch. In this article, we’ll share some tried and tested marketing strategies for developing a powerful list.
Why you need to build an email list
As a small business owner, you have a huge asset that enterprises can’t compete with: you.
It’s much easier for a customer to build a relationship with a human than a faceless organization.
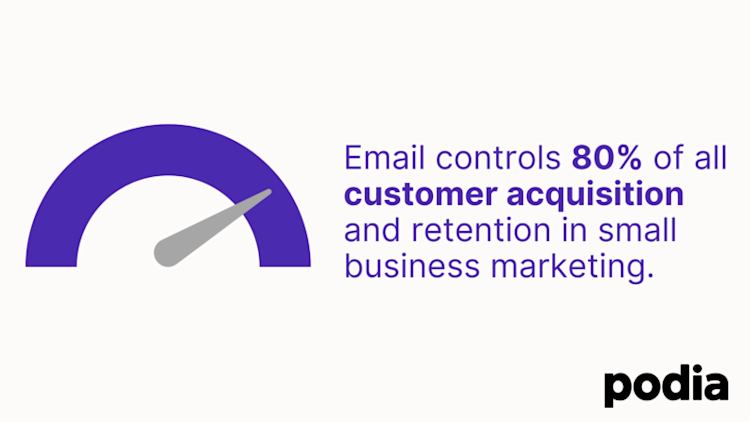
And it doesn’t get much more personal than an email newsletter — your voice and story land directly in your subscriber’s inbox. It’s no wonder that email controls 80% of all customer acquisition and retention in small business marketing.
Plus, with social media channels, you’re a flimsy paper boat that has to cope with the weather of ever-changing algorithms. With email marketing, you control the weather, the ocean, and the ship.
The best news is that your email list doesn’t need to be huge to be impactful.
For example, Phil Frost’s client had 45 people on his email list. This might seem tiny, but it generated $1,000 of business thanks to a simple three-part email sequence.
The secret to this success is that the list wasn’t a motley crew of friends and family. It consisted of already interested subscribers.
In other words, it’s better to have a small but mighty list than a huge list of uninterested subscribers.
But before you start attracting these subscribers, you need somewhere to build your list, a.k.a. an email marketing provider.
Step 1: Choose an email marketing provider
To build a list, you need an email provider that’s easy to use and integrates with your online business. For example, if you run an ecommerce store, you want to create a seamless purchasing experience.
Or, if you sell webinars, you don’t want to waste hours syncing sign-up sheets with your email lists.
Here’s our list of the best email marketing platforms to help you decide.
If you want an intuitive experience that lets you create no-fuss sales funnels, try Podia.
Here are some of its key features:
-
Free drag-and-drop website builder
-
Unlimited subscribers and emails
-
Sell your online courses, digital downloads, and webinars from the same platform you run your email marketing
-
Send automated email sequences
-
Add capture forms on any page
-
Segmentation by lead magnet or previous purchases
-
Email analytics including revenue metrics
Get started today with a free 30-day trial.
Creating an email on Podia is deliberately clutter-free. You don’t need to wrestle with templates, just get typing.
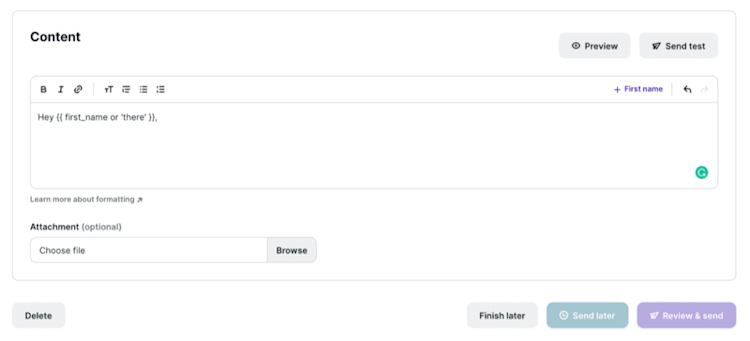
If you want to, you can keep your emails text-based for a better reading experience across all devices. 50% of emails are read on mobile, so this is an important consideration.
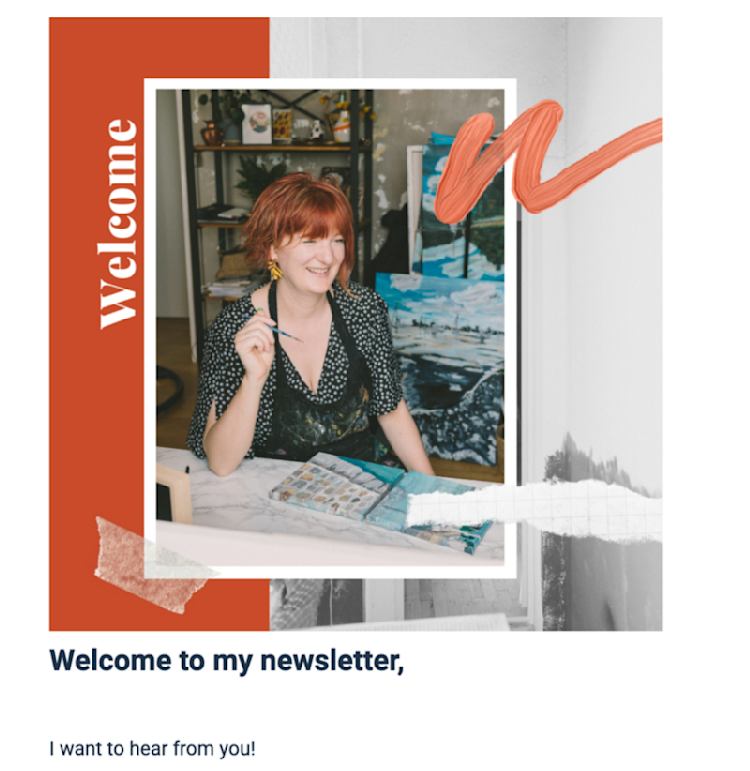
You can also add rich text, images, and GIFs to your email. Simply drag and drop your graphics into your email, as I have done here.
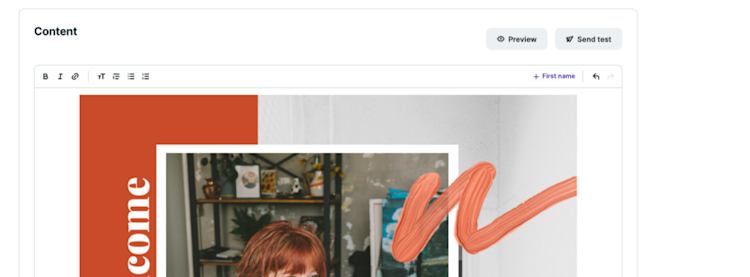
Which, when previewed in a test email, looks like this.
Podia’s email does have its limitations. For example, you cannot do A/B testing. A/B tests are when you find out which version of your email performs better, such as with a different subject line.
But A/B testing is only effective when you have huge email lists already, so it’s not a necessary feature for building yours.
Your choice of email service provider will be personal to you and your business. Whichever one you choose, check that it provides you with email capture options, as this is essential for the next step.
Step 2: Capture emails on your site
If you want to grow your mailing list, make subscribing easy.
You can do this in multiple ways. There’s the old-school way of adding sign-up links to your email signature or business card.
Or, you could make the most of the options offered by your email service provider. For example, opt-in forms, email capture sections, pop-up forms, or even dedicated landing pages.
If you use Podia, here’s how to easily create landing pages and email capture sections on your website.
Insert an email capture section
Email capture is a broad term for a section on your site that will collect email addresses. You use it to entice website visitors to offer their email addresses and receive emails from you.
For example, this section of Nora Conrad’s homepage is an email capture section. It does a great job of making the newsletter look appealing by focusing on the value.

Nora personalized the button instead of going with a traditional “submit”. It matches her friendly language and sends the signal that her emails will be both fun and pertinent.
To convince as quickly as Nora does, be clear about what subscribers are committing to. For example, Nora is upfront about the frequency of emails (once a month) and their content (tips, ramblings, resources).
You can quickly create an email capture on Podia. Choose “Edit site” in your dashboard, then select the “Newsletter” option in the left-hand menu.
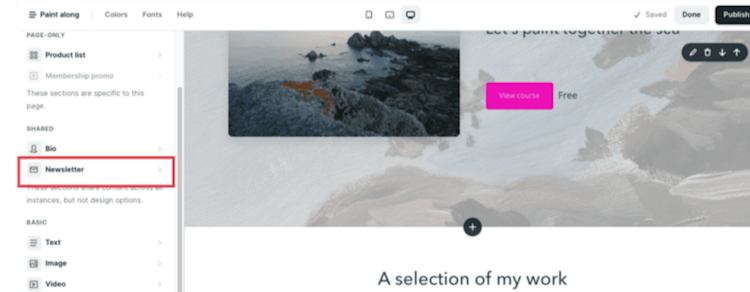
Personalize your email capture section as you’d like, including the button text. Change the colors and add a background image (if desired, just make sure your branding is consistent).
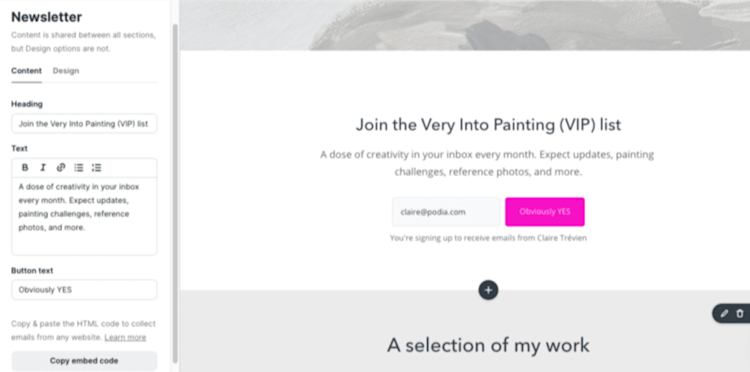
Once you’ve set this up, you can add this section in one click to any of your Podia pages.
There’s also an embed code version in HTML that you can copy and paste to any other website you use, such as on a WordPress blog.
Of course, you can go a step further if you want to convince your site visitors to subscribe — and that’s by building a dedicated landing page.
Build a landing page
Give your newsletter the focus it deserves by building a dedicated landing page for it.
There’s no harm in creating multiple landing pages. Companies that have 30 or more landing pages generate seven times more leads than those that don’t.
Plus, creating a landing page with a single call-to-action (CTA), such as a newsletter subscription, ups your conversion rates by 1.6%.
Your landing page is going to vary depending on what your newsletter talks about. Theskimm’s newsletter is a daily roundup of the news, so they keep their landing page simple.
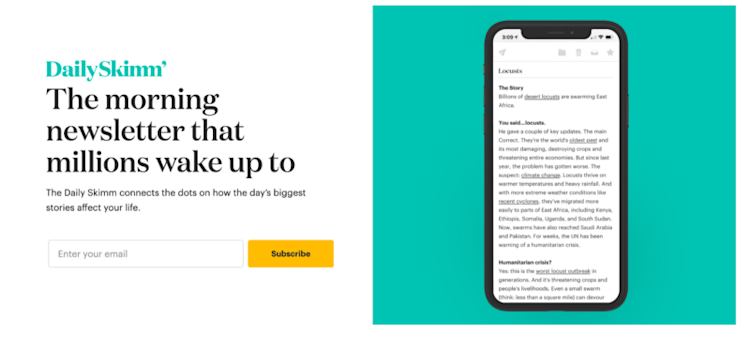
On the right, there’s a screenshot of a typical newsletter. This gives subscribers an idea of what they’ll be receiving. And, if they scroll down, they can read previous issues of the newsletter.
This approach works because their offer is straightforward and doesn’t require much copy to be understood.
Alexandra Franzen’s newsletters are more varied from week to week, so her landing page goes for a different, less visual approach.
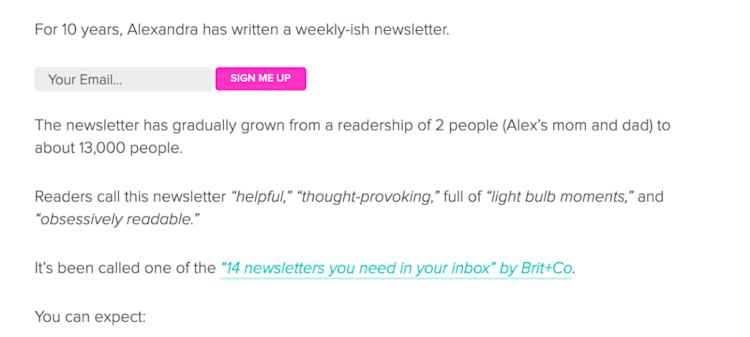
Alexandra leads with social proof — from how many subscribers she has to how the newsletter has been ranked and praised over the years. Then, she discusses the content of her newsletters.
Basically, your landing page’s length and style will depend on the content of your newsletter. If it’s easy to understand at a glance, keep it short. If screenshots, extracts, and social proof will help convince readers, go for that approach.
You can create as many landing pages as you want in Podia. Let me show you.
In your dashboard, choose “Edit site”.

Then click the three lines in the upper left corner (hamburger menu). This opens up an editor. Select “New page”.
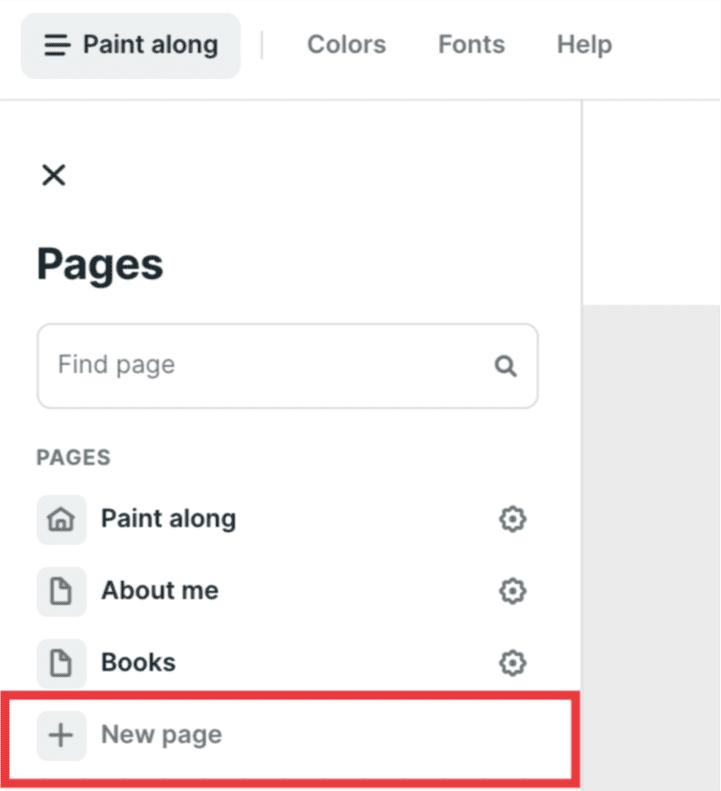
This action takes you to a blank page — you just need to click a plus sign to add elements to it. It’ll open a sidebar on the left.
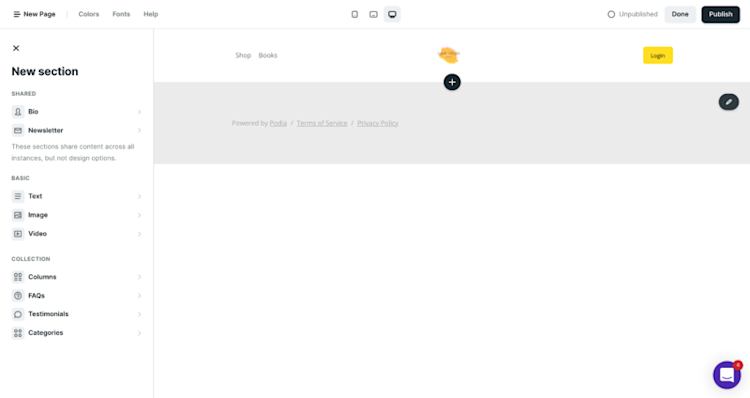
I will start by adding a columns section to achieve a style similar to the Skimm’s look (minimal).
In the first column, I’ve added text, and in the second one, an image sourced on Unsplash.
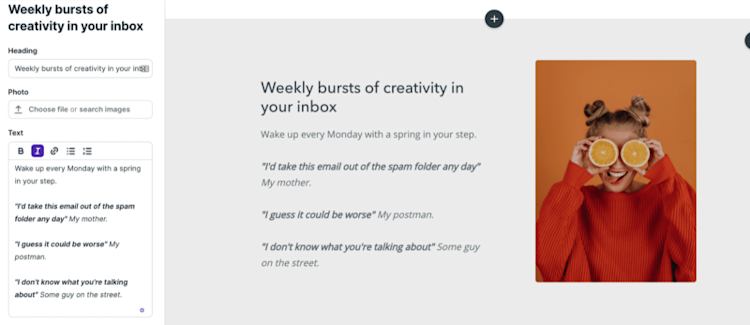
I used this first section to give a taster of the newsletter and share some social proof.
Next, because I need to capture their email, I add a newsletter element.
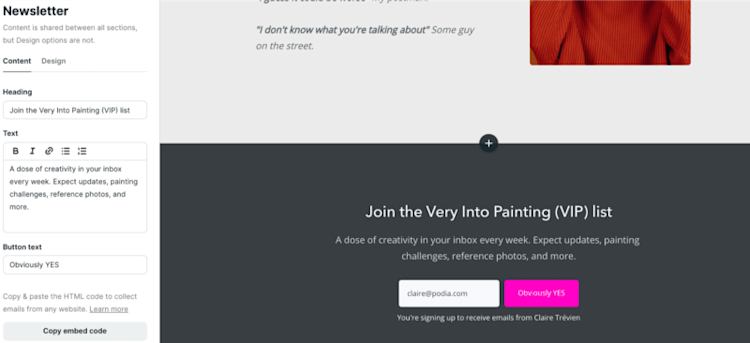
After this, I could add various other elements such as further testimonials, a video introduction, or a gallery of past newsletter issues.
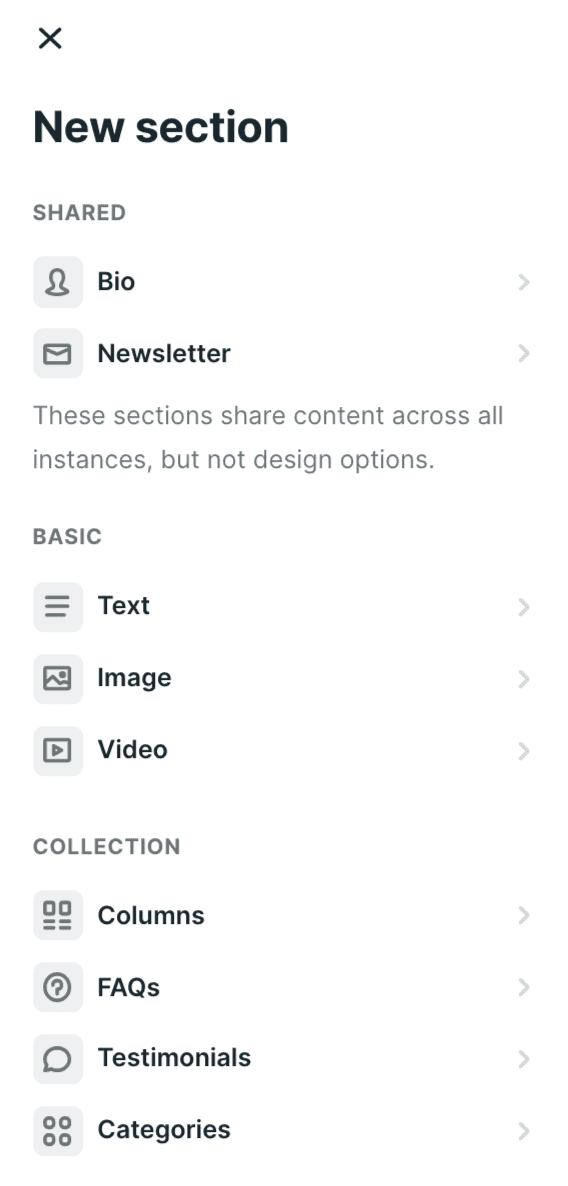
One great option is to add your bio, just in case visitors to the page don’t know who you are. Choose the “Bio” section to do this.
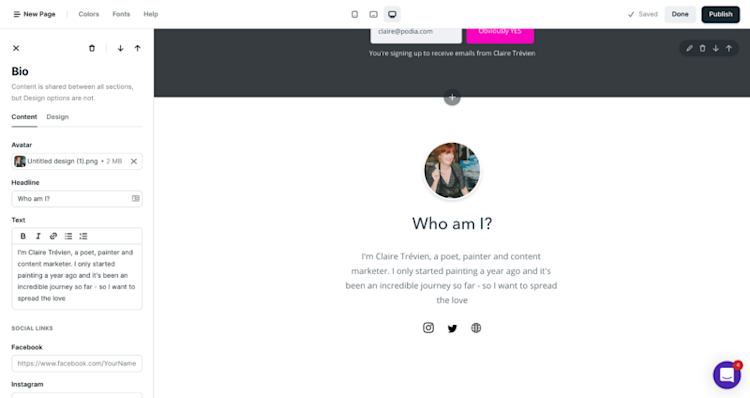
Once you’re happy with your landing page, publish it. It’s that simple.
Here’s the gist:
Make it easy for your visitors to sign up for your newsletter wherever they end up on your website. Use email sign-up forms and a dedicated landing page to increase your chances of conversions.
And if you want to convince them to sign up, there are ways of sweetening the deal.
Step 3: Create lead magnets
Attracting the right people is the most crucial step of building your email list. Lead magnets entice your visitors to sign up for your newsletter.
Lead magnets can take various forms depending on your business. They can go from checklists and templates to bonus podcast episodes and ebooks.
They don’t need to be epic in size to work. Both short-form text and video perform better as lead magnets than their longer counterparts.
So bigger doesn’t necessarily mean better, though it depends on your audience and business. For example, if you’re a novelist, a free ebook will appeal to your readers even if it’s several hundred pages long.
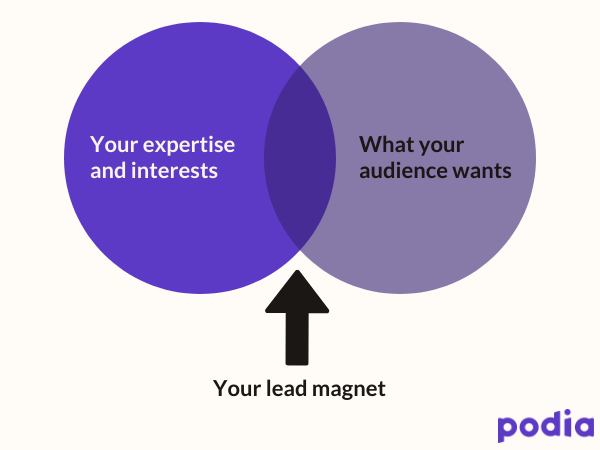
For lead magnets to be effective, they need to sit in the sweet spot between your expertise and what your audience wants.
One way to sort through your ideas is to plot them on the Passion/Profit matrix.
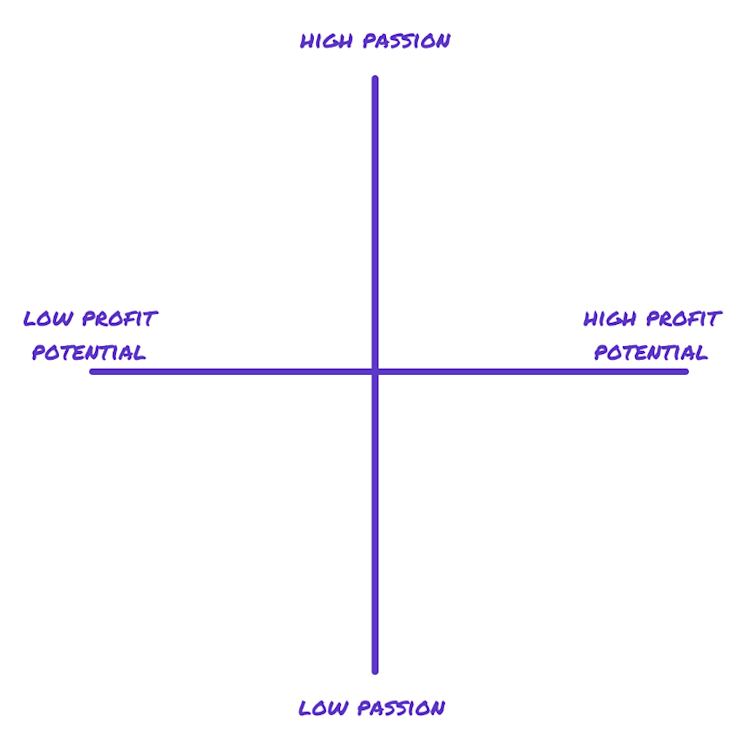
If you feel passionate about a lead generation idea and you think it’ll be popular with your potential customers because they’re already spending money on it somewhere else, put it in the upper right corner. That quadrant is where your best lead magnet ideas live.
That’s the sweet spot Monique Malcolm found with her lead magnet: the Brilliant Idea Guide.
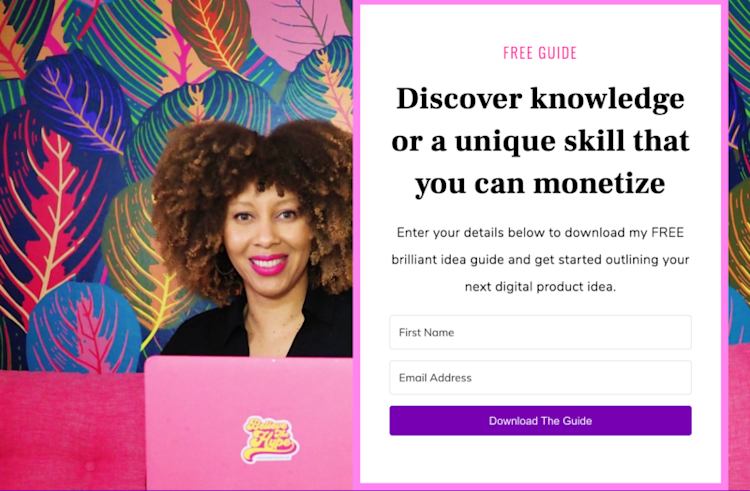
It’s the perfect lead magnet for her audience of solopreneurs. It gives them immediate value as they take their first steps into business.
And for Monique, it’s a powerful list-building strategy for her newsletter.
As you sign up, Monique asks visitors to confirm their consent before being added to her email list. This is important if you want to comply with various email regulations, including GDPR and CAN-SPAM.
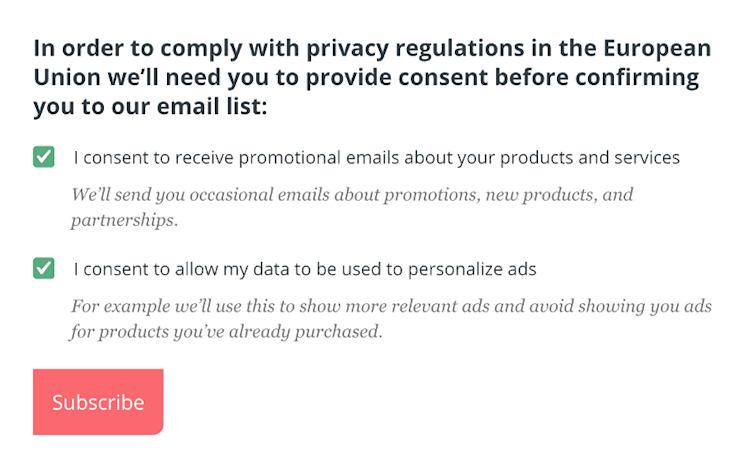
It also means that everyone on your email list actively wants to be there. It’s a win-win situation.
If you’re feeling ready, here’s how to create your first lead magnet in 90-minutes or less. Ideas include turning a blog post into an ebook, making a list of your favorite things, and turning your processes into a checklist.
Regardless of how many visitors you get to your site, make sure your lead magnet is relevant and useful to your audience.
As long as you do that, this next step will be a breeze.
Step 4: Attract subscribers on social media
You’re ready to capture emails on your website, helped by some relevant and appealing lead magnets. But how will your readers find you?
Social media is a logical starting point for finding your audience. But it can be challenging to know which social media accounts to focus on.
Here are two tactics to try today.
Design a Twitter thread
With 330 million monthly active users, Twitter is one of the best social media platforms for small businesses.
But with such a fast-paced timeline, you might be wondering how to stand out from the crowd.
Wonder no more. Creating Twitter threads (sometimes called tweetstorms) is the perfect solution.
Twitter threads are a great way to build curiosity, tell stories, and get you plenty of attention. They get 63% more impressions and 54% more engagements than tweets with links.
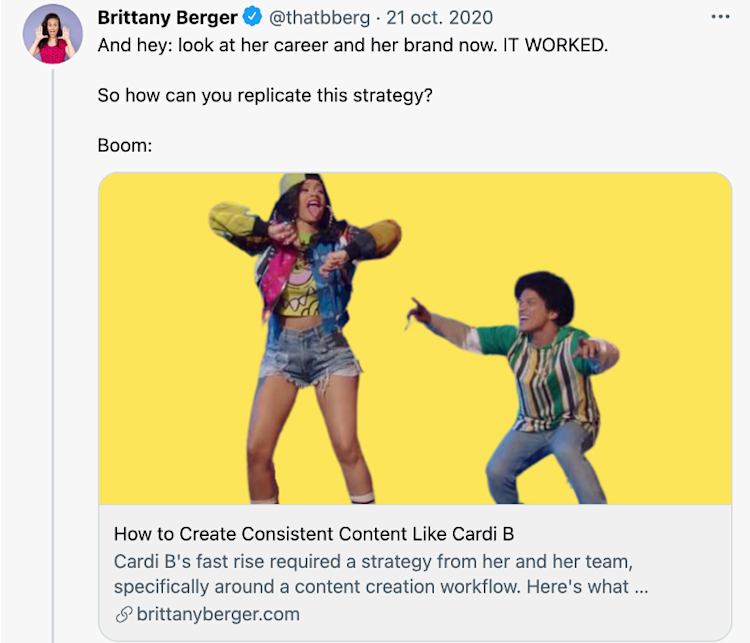
Take, for instance, Brittany Berger’s Twitter thread, which is intriguing from the very first tweet. You absolutely want to understand Cardi B’s winning collaboration strategy.

The thread ends with Brittany’s call to action, a blog piece on the topic. By the time you’ve read through the thread, you’re ready to click through to find out the strategy.
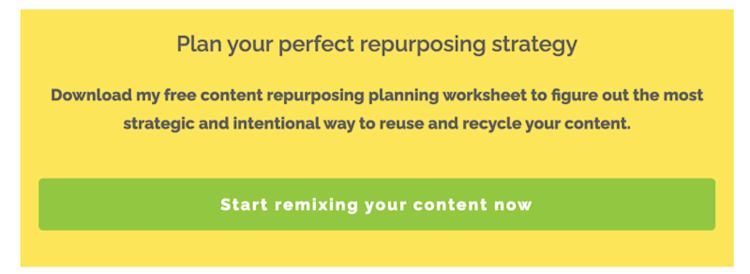
The blog includes a CTA to download Brittany’s lead magnet: a content marketing strategy worksheet. After being wowed by her approach to content, hitting download is a no-brainer for her audience.
The content for her Twitter thread was repurposed from her blog post. Like Brittany, you could take the main talking points from your lead magnet and build them into a Twitter thread.
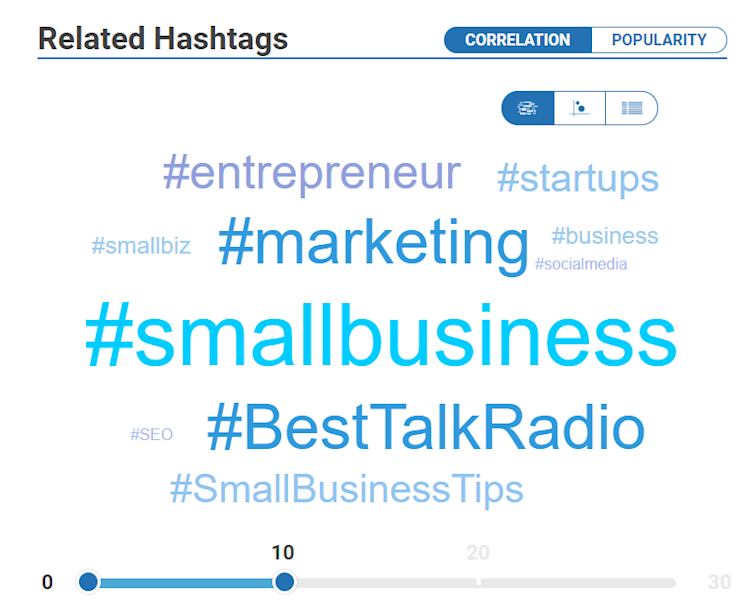
Keep in mind that you’ll likely need to do this more than once if your audience isn’t robust and engaged (because you’re still in the early stages), and relevant hashtags will be critical.
Hashtagify is a convenient tool to use for finding related hashtags, but it’s one of many options. We favor it because it has a convenient visualization for related hashtags, seen below:
If your audience is more LinkedIn than Twitter, here’s a different approach to try.
Create a LinkedIn Slide
LinkedIn is one of the top social media platforms for sharing content. Unsurprisingly for a professional network, one of the most effective types of posts on LinkedIn is slides.
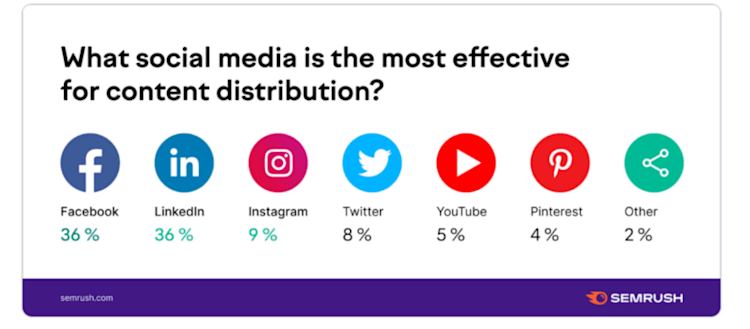
A LinkedIn slide, also known as a carousel post, is when a set of slides has been uploaded as a PDF. They perform better than other posts because they are interactive (the reader has to click to view each slide).
Here’s how Kasey Jones uses the format to announce her new newsletter, including its content.

Using this format draws attention to announcements that could otherwise go unnoticed.
You could also use it to share extracts from your lead magnet and get them intrigued to click through and download it. Best of all, using a tool like Canva, you can build it in just a few seconds. Here is a free template to get you started.
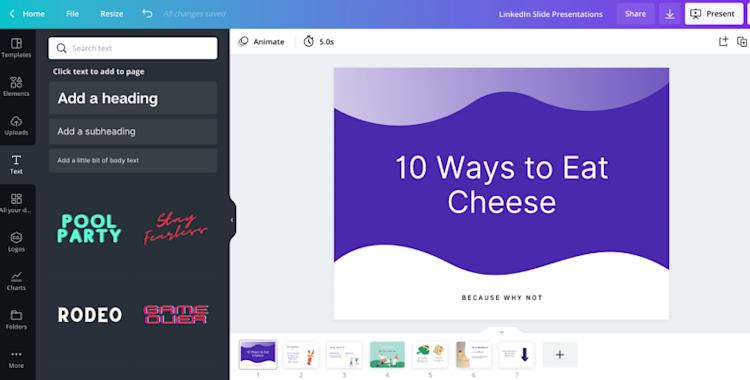
Twitter threads and LinkedIn slides are two tactics with significant impact, but they’re not the only ones. You could grow your list using YouTube or focus on Instagram if those are the channels most used by your potential customers.
Whatever platform you choose, what matters is that you don’t just share a link without context. Set the scene and make it relevant to your customers and their pain points.
Attracting subscribers is important but so is what happens next.
Step 5: Nurture your audience with a welcome sequence
Acquiring an audience is one thing; keeping them is another.
Use welcome emails to make your subscribers want to stay.
Welcome emails have an incredible 91.43% open rate, so they’re an opportunity to make a fantastic first impression.
Like Moment, you could use the occasion to offer new subscribers a discount.
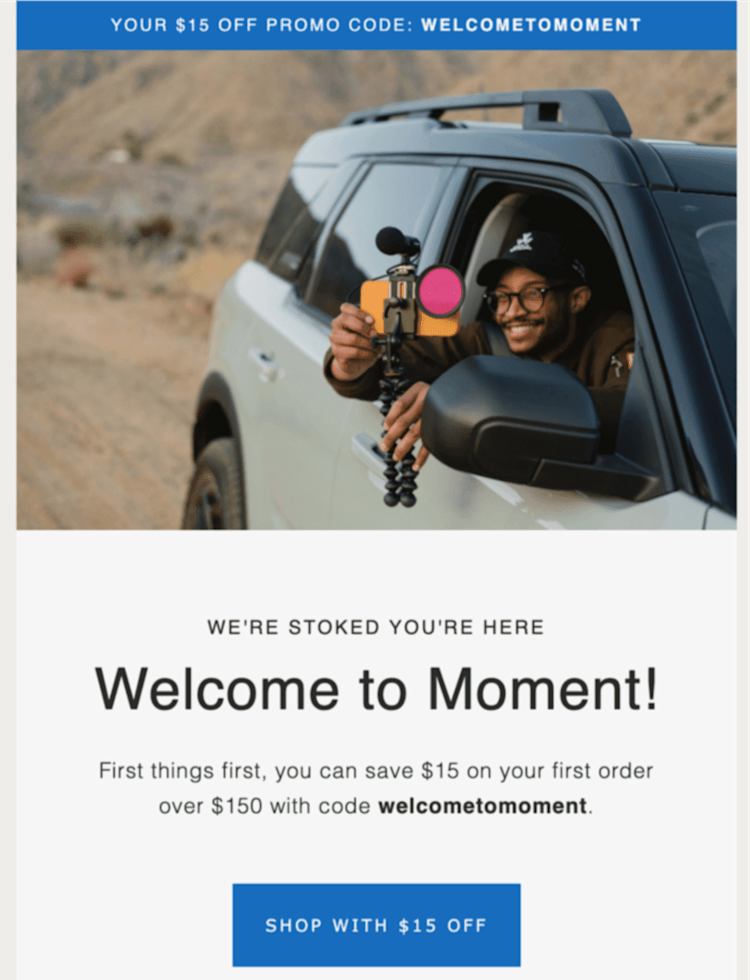
Rewarding your subscribers with discounts or bonus material is a solid strategy. It’ll endear you to them and, hopefully, discourage unsubscribes.
Welcome emails are also an opportunity to set the tone for your newsletter. Mark Manson’s first email does a great job of sharing high-quality content and establishing his dry sense of humor.

Part of the job of a welcome email is making sure you’re in the right place. After reading Mark’s email, you know whether it’s right for you or not.
Whether your welcome emails are standalone or a sequence, it’s a good idea to automate them. Your subscribers will be at their most engaged in the first 48 hours of signing up, which is why scheduling them is a good idea.
You can do this in Podia by visiting the “Email” section in your dashboard. Then, click the “Create” button and select “New campaign”.

Edit the email campaign by selecting what will trigger your email(s) into being sent. For example, if they sign up for your newsletter or download a lead magnet.
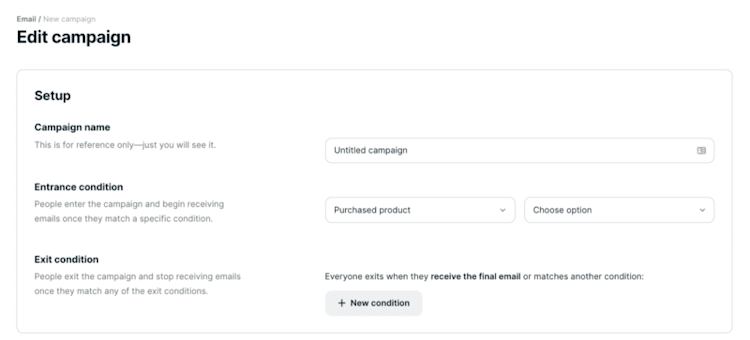
Then you can start writing your campaign, whether it’s one email or several.
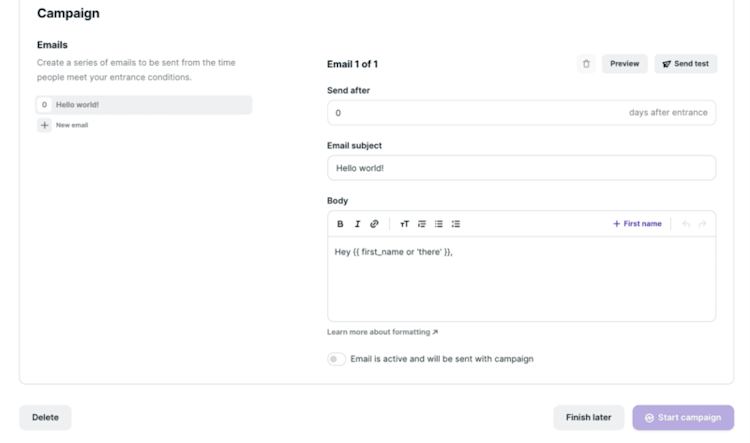
Drag images or GIFs into your email body if you want to or keep your email text-based. Once each email is set to active, you can launch your campaign.
Looking for inspiration? Try our sales email templates, which include a welcome email.
Basically:
Reassure your readers that they’ve made the right decision when they gave you their email address. They’re much more likely to stay and help your newsletter be the success it deserves to be.
Email list building made easy (or easier, anyway)
Starting from scratch with your email list is a fantastic opportunity to do things the right way. Instead of trying a thousand different tactics, concentrate on our five steps for a structured and mindful approach to the process.
The key steps are:
-
Choose an email marketing platform that supports your needs.
-
Make it easy for your visitor to sign up for your newsletter. Offer different sign-up form options, such as email capture areas and landing pages.
-
Create lead magnets that are valuable to your target audience, e.g., case studies or cheat sheets.
-
Attract subscribers by sharing your lead magnet and newsletter on social media. In particular, try to create Twitter threads with relevant hashtags or LinkedIn slides.
-
Make your new customers feel appreciated by setting up a welcome email.
Building your newsletter is more of a marathon than a sprint, so don’t get discouraged if you don’t see immediate results. Focus on attracting quality readers, and your hard work will pay off.
