Selling printables online is one of the easiest ways to start making money with digital products. They’re simple to create, and after making them once, you can sell them forever. But what makes them especially powerful is how they can fit into a bigger business system, not just as one-time products, but as the first step in a long-term relationship with your audience.
Printables were actually the first digital product I ever sold, so they’ll always have a soft spot in my heart. And I know they can be a game changer if you use them well.
In this guide, we’ll cover:
- Types of printables you can sell, no matter your niche
- How to set up your first printable product in Podia
- Tips for expanding your earnings with related courses, bundles, and offers
By the end, you’ll have a step-by-step guide for selling your printables online and turning that simple download into a system that brings in long-term income and happy fans.
Are printables worth my time?
At this point, you might be wondering if printables are really worth your time. They usually sell for a few dollars, and they might not feel as exciting as something like a signature online course. But that’s exactly what makes them such a great starting point.
Unlike more hands-on offers like coaching, memberships, live webinars, or interactive courses, you only have to create a printable once. If it’s helpful to your audience, you can sell it unlimited times, which means you could potentially reach a huge group of people.
Because printables are typically sold for lower price points, it gives potential customers a low-risk way to buy from you. And best of all, you can use it as an opportunity to introduce them to the rest of your business. Low cost doesn’t have to equal low value, so think of this as a chance to get your foot in the door and show your buyers just how much you have to teach them.
What printables should I sell?
Great question! There are so many directions you can take, depending on your audience and the things you teach in your business.
Some creators sell planners, calendars, journals, or habit trackers. Others offer educational materials like worksheets, flashcards, or classroom activity kits. You might create wall art, greeting cards, party decorations, coloring pages, sewing patterns, or household labels.
The best printables are useful, fun, or time-saving.
The key is to think about what your audience needs. What’s something they could use, print, or fill out to make their life easier or more enjoyable?
If your target audience is busy parents, a printable summer activity workbook to keep the kids occupied could be a great fit. If you work with clients who are interested in personal development, a printable journal with mindfulness prompts would be right up their alley. If you teach marketing to fellow entrepreneurs, a printable content calendar could save them precious time in their day.
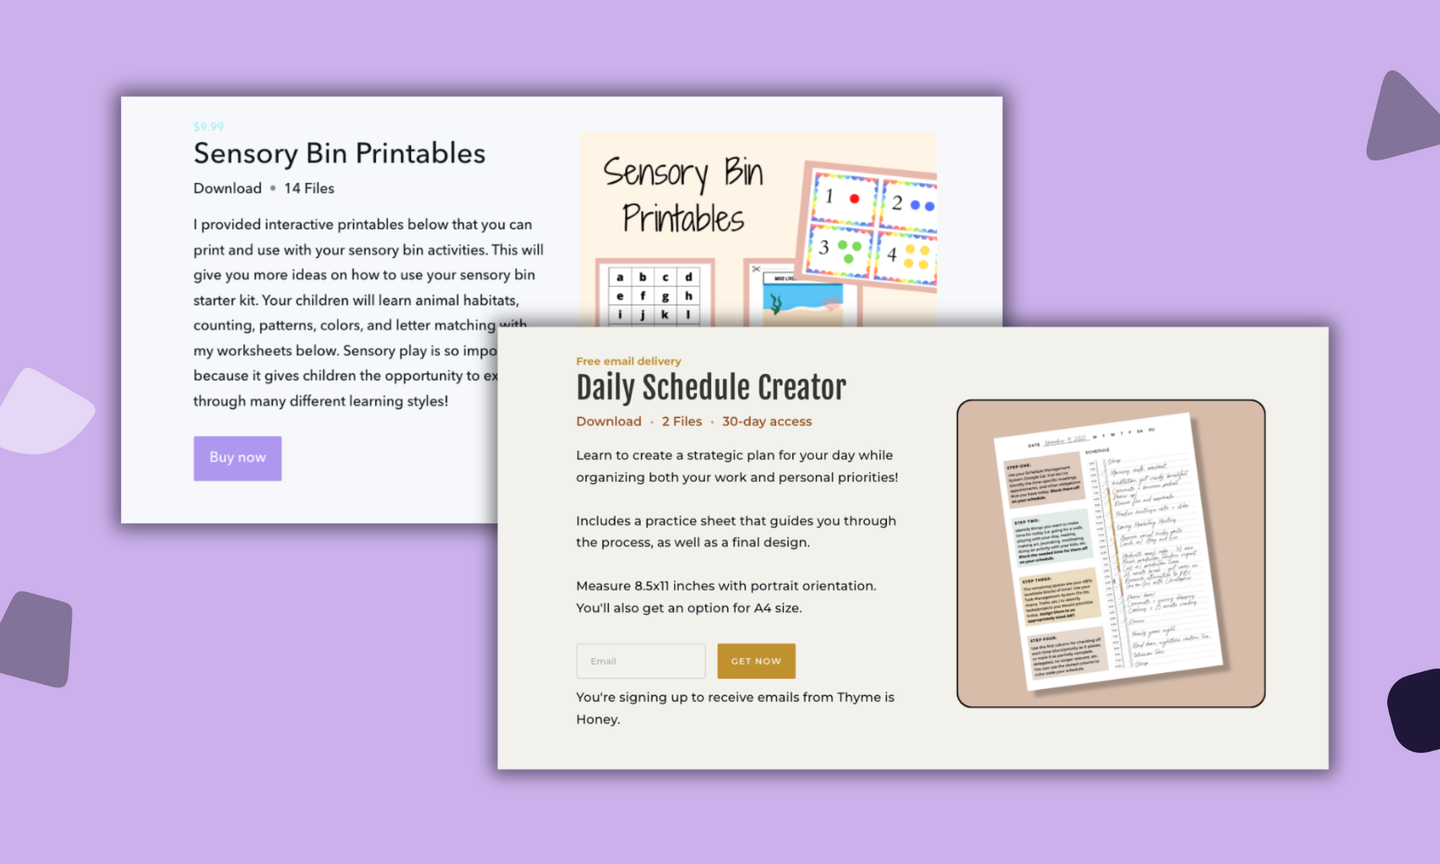
Systems and productivity expert Dani Bruflodt, for example, has a printable daily schedule tool that helps her audience organize their time and stay focused on their priorities.

And Emma Freeman from Deep Rooted Healing teaches mixed media art classes, book-making, and creativity, so one of her products is a set of printable illustrations for art journaling.

As always, if nothing is jumping out at you, the best way to get ideas is to ask your audience.
Send out an email, post on social media, or ask someone in your target audience directly next time you see them: “What kind of printable resources would make your life better?” Then use their ideas as a starting point.
How to sell printables online, step by step
Once you’ve got your idea locked in, you can follow these four steps to get everything set up, make your first sale, and incorporate your printable into the rest of your business.
- Step 1: Make your printable file
- Step 2: Add it to Podia
- Step 3: Set up a sales page so buyers can find you
- Step 4: Use email marketing to keep the momentum going
We’ll also look at a few bonus ideas you can use to expand your earnings with upsells, product bundles, and subscriptions.
But first…
Step 1: Make your printable product
Before you can start selling your printable, you need to make it. (I know, I know — groundbreaking advice, right?)
Luckily, there are plenty of tools you can use to bring your product to life.
Canva is a great option for beginners, but you can also use platforms like Google Sheets, Google Slides, Excel, Illustrator, or InDesign to create your printable resource. You can even hand-draw something on an iPad or tablet if you want.
It’s a good idea to create your printable file in a common printing size like A4 or US Letter (easier for home printing), and when you finish, make sure to export your final product as a PDF. PDFs essentially lock your design in place, which helps ensure your formatting stays the same when your buyer goes to print.
If you’re using Canva, for instance, you can click “Create a design” and then choose “Print products” to pull up a menu of popular sizes and templates. This way, you know your design will look just as good in real life as it does on your screen.

Pro tip: If your printable has complex printing instructions (like a sewing pattern that needs to be assembled after printing), make sure to include an instructions sheet for your buyer. This makes it easier for them to use your product right away and reduces your customer support messages.
Okay, onward to selling.
Step 2: Add your printable to Podia
Once your printable file is ready, log in to your Podia account and go to the “Products” section in the left sidebar. Create a new product and choose “Download.”

Here, you’ll add your printable file, give your product a title and a description, and set your price. Printables are often sold as one-time purchases, but you can also offer them for free, set up a payment plan, charge a subscription, or include them in a membership or bundle.

Click “Publish,” and you’re all set.
Podia will handle the file delivery and payment processing when someone buys your printable.
All you need to do is attract buyers, and one of the easiest ways to do that is with a great sales page.
Step 3: Create your sales page
For people to buy your products, they need to be able to find them. That’s why Podia automatically creates a simple sales page for every product you add.
The system pulls in your product details like title, description, featured image, and price, and everything looks nice right out of the box.

But if you want to go a step further, you can also customize your sales page using Podia’s point-and-click website builder.
Click into the Podia website builder, and you’ll see a list of all pages on your site. Find the name of your printable to update your sales page.
Podia’s website builder lets you change your site colors and fonts, customize your product page layout, and add additional website sections like testimonials, FAQs, or an author bio, all in a few clicks.

For printables, it’s a good idea to include a note making it clear that this is a digital product.
I recommend adding a text section that says something like: “This is a digital file. Nothing physical will be shipped. You’ll receive a PDF to download and print at home.” That way, your buyer knows exactly what they’re signing up for.
Once your sales page is ready, you can link to your product in your blog posts, website, social media bio, video captions, or anywhere else your audience spends time. You can also incorporate it into your email marketing by sharing it with your newsletter or adding it to your email welcome sequence for new subscribers.
Then you can continue to use email marketing to make even more sales, which takes us to the next step.
Step 4: Continue selling in your email marketing
Selling a printable once is awesome! But using it to bring someone into your business? That’s where the real value is. And email marketing is the gold standard for keeping the momentum going after someone signs up for one of your products.
Here’s an example of how that might look:
Someone finds your printable on your blog, in a social post, or through a search. They buy it, Podia automatically delivers the file to their inbox, and you do a happy dance!
Then the next day, they automatically enter an email welcome sequence that you built in Podia. Over the next week, they get these emails:
- Email 1: You introduce them to your brand and business and share some tips for how they can use their new printable.
- Email 2: You share some free advice or lessons learned on your journey. Maybe you link to a popular blog post or YouTube video.
- Email 3: You tell them about another paid product, like a course, coaching offer, or subscription, related to your printable. You might even offer a discount code as a perk for being an existing customer.
This format helps your new buyers get to know you and your work, while also providing them with even more value and building trust.
And the best part? You don’t have to sit on your computer manually sending all these emails. Everything is run automatically through Podia. All you have to do is set up an email campaign, write the emails, set the start trigger to “Gains access to [printable]”, and everything will run for you in the background.
You get to do the work once and benefit over and over again. And, hey, if your customer doesn’t buy the additional products you tell them about, that’s totally fine too. Because now they’re on your email list, where you can stay in touch through regular email newsletters, let them know about sales, and tell them about future products you make.
When you use it alongside email marketing, your printable becomes a powerful way to bring people into your business for the long haul.
And with that, here are even more ways you can expand.
Expand your printable revenue with bundles, upsells, subscriptions, and other products
Once you’ve got one printable selling, you can increase the total value of each order with bundles, upsells, subscriptions, and related products.
If you have several related printables, you can sell them as one-off downloads or package them together and sell them as a bundle for a higher price. For example, if you have a habit tracker, weekly planner, and goal-setting worksheet, those could easily become a “New Year Productivity Pack.”
When I was selling printables for teachers, I sold several different packs of classroom activities individually, but I also had a mega bundle of all my printables that people could get for a discounted price. The discount was a great deal for them, and I made more off each transaction.
Similarly, Coco’s Caravan sells printable sensory bin activities for kids. Rather than selling each printable individually, she bundles them into one product with 14 different activities, so her customers get more value.

Upsells are another way to expand your earnings on each printable sale. An upsell is a product your customer sees right after checkout, like a related printable, course, or template. Usually, upsells have a special discount that’s only available right then to make it even more enticing to buyers. In Podia, you can add as many upsells as you like to each product, and customers can buy one, some, or all of them.
Another option to get more mileage out of your printable is to turn it into a membership or subscription product.
For instance, if you design monthly planner pages, seasonal homeschool worksheets, or themed holiday decor, a monthly printable subscription might be the perfect fit since people can join once and get access to fresh printables on a regular schedule.
That’s what Justine Hovey does in her VIP crafting membership.

Customers can buy individual crafting printables, but they can also upgrade to get a full VIP membership with tons of crafting resources and inspirational project ideas.
Sell your printables online and build a system that grows
Selling printables is a great way to start getting your work out there and helping your audience, and it doesn’t require complicated tools or months of production time. All you need is an idea that helps people, a free design tool like Canva, and a Podia account, and you can start making sales today.
And once your printable is out in the world, there are tons of opportunities to grow. Use the printable as a starting point to bring people into your email list, add upsells and product bundles, and even turn your work into a recurring subscription if you like. As long as you’re providing value, you’re doing it right.
You can set up your printables and everything else you need to build your business in one tool with Podia. Start your 30-day free trial and upload your first printable today.


